You will also need:
- 4x6 photo
- alphas
- Kindy Glitz
- Liquid Pearls, if desired
- Corner punch
*Some items and colours in kits will vary.

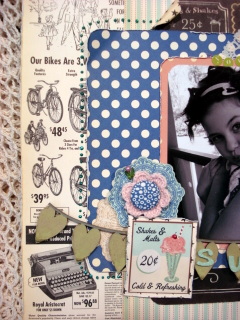
Steps
- Cut "little girl"out of the "Bubblegum" paper and put aside.
- Cover button and set aside (see step-by-step photos at end of this blog).
- Cut a 4 inch strip out of the striped paper. Distress edges and stick to background paper "Jawbreakers".
- Cut "Wax Bottle"paper 25cm x 21cm and round corners with punch. Distress and adhere to right side of layout (see photos).
- Cut "Bubblegum"paper 18cm x 25cm and round corners. Distress and attach (see photos).
- Punch corners off photo and attach to pink spotty paper, leaving a 1cm border around photo. Punch corners and distress.
- Place doily under mounted photo and attach to centre of layout (see photos).
- Place little girl to right of photo.
- Place the brown doily sticker to the left of photo. Use mounting tape to attach the blue doily over the top (see photos).
- Attach crochet flower and then the button. Place pin behind and to the side of flower.
- Ink or paint the heart bunting. While still wet, peel up some of the chipboard and ink exposed chipboard to create a worn look. Colour the bunting string in a darker shade (I used grey).
- Using the leftover "Wax Bottle"paper, adhere the "shakes and malts"sticker down, trim around and distress edges. Use mounting tape and adhere (see photos).
- Cut heart bunting into two parts, one with 3 hearts and the other with 6 hearts. Place either side of mounted sticker and attach with mounting tape.
- Add journalling tag near the bottom and add desired title.
- To finish off, use Kindy Glitz and Liquid Pearls where desired.


Covering your button


